This site is supported by our readers. We may earn a commission, at no cost to you, if you purchase through links.

collar that fits wrong doesn’t just fail to train—it can injure. Veterinary reports consistently show collar-related neck injuries rank among the most preventable causes of chronic pain in working dogs. Yet most owners size by feel, eyeballing the fit and calling it good.
problem runs deeper than guesswork. different training goals demand different collar types, and each type has its own fit standard. martingale worn like a flat collar loses its function entirely. e-collar positioned too low misses the target muscle group and delivers inconsistent stimulation.
Knowing how to properly fit a dog training collar starts with matching the right tool to the right method—then nailing the measurement.
Table Of Contents
- Key Takeaways
- Choose The Right Training Collar
- Measure Neck for Accurate Sizing
- Adjust for Coat and Growth
- Fit Flat and Martingale Collars
- Fit Prong Collars Safely
- Fit E-Collars and Head Halters
- Spot Signs of Poor Fit
- Top 4 Training Collars
- Frequently Asked Questions (FAQs)
- What is the 3 second rule in dog training?
- What are the common mistakes in e-collar training?
- Can two dogs share one training collar?
- How often should collar hardware be replaced?
- What age can puppies start wearing collars?
- Should collars be removed during car rides?
- Can collars interfere with microchip scanners?
- Conclusion
Key Takeaways
- Collar fit starts with matching the right collar type to your training goal—martingales, prong collars, and e-collars each have their own placement standards, and using the wrong one incorrectly doesn’t just underperform; it can injure your dog.
- Always measure your dog’s neck with a flexible tape at the exact spot the collar will sit, record the number in both inches and centimeters, and add two finger-widths of slack—never size by feel or rely on measurements older than a few months.
- Coat thickness, breed neck shape, and puppy growth can shift a perfect fit within weeks, so recheck fit after every weight change, seasonal coat shift, or growth spurt rather than assuming last month’s adjustment still holds.
- Poor fit shows up in your dog’s body before it shows up in your training results—red marks, hair loss, coughing, collar rotation, or repeated scratching are all signals to stop, refit immediately, and inspect for skin damage.
Choose The Right Training Collar

Not every collar works for every dog — or every training goal.
Puppies especially need careful timing — check what age puppies can safely wear training collars before you start.
The right choice depends on your dog’s size, coat, breed, and what you’re actually trying to teach.
Here’s what to think about before you buy.
Match The Collar Type to Your Training Goal
Your training goal should drive every collar decision you make. Recall boundary training calls for a martingale. Elevated distance cues need an e-collar’s remote reach.
Gentle handling safety points toward a padded flat collar or head halter.
Puppy beginner basics pair best with lightweight flat collars and positive reinforcement.
For high-intensity pull control, choosing the right type of training collar changes everything.
Accurate sizing requires measure neck circumference with two finger widths of slack.
Compare Flat, Martingale, Prong, and E-collars
Each collar works differently.
Flat buckle and martingale collars use simple adjustment mechanisms and suit everyday wear with even pressure distribution. A prong collar applies brief, targeted contact for strong pullers. An ecollar offers remote range with variable settings — but battery life and noise levels matter for long sessions.
Collar fit and collar safety depend on understanding exactly what each type does before you buckle anything on.
Choose a Collar Width That Suits Your Dog’s Size
Width matters more than most handlers realize. Small dogs do best with 10–14 mm collars; medium dogs need 15–20 mm for balanced control. Large breeds require wider collars to distribute pressure across a broader surface.
Adjustable width advantages include scaling with puppy growth — start narrow, then expand. Match collar width to your dog’s current neck measurement, not an estimated size.
Consider Coat Length, Breed, and Neck Shape
Coat Length Impact goes beyond aesthetics.
A thick double coat can add 1–2 inches to visible neck girth without changing the actual skin circumference — that’s Coat Texture Effects in action.
Breed Neck Variations matter too: sighthounds slip collars easily, while brachycephalic breeds need snug but non‑pinching fits.
Factor in Seasonal Fur Adjustments and Neck Shape Contours before finalizing any neck measurement.
Pick Durable Materials That Adjust Smoothly
Material quality makes or breaks long-term fit. Nylon reinforced stitching resists fraying through thousands of adjustment cycles, while neoprene padding reduces chafing without sacrificing smooth movement.
Biothane coating withstands sweat and rain without stretching. Pair that with stainless steel hardware and self-lubricating buckles, and your adjustable sliders stay precise.
Whether you choose a soft-padded nylon collar or a heavy-duty metal buckle style, collar material selection directly affects how consistently your adjustable dog collar performs.
Measure Neck for Accurate Sizing

Getting the right collar size starts with one thing: an accurate neck measurement. Skip this step and you’re just guessing, which means a collar that’s too tight, too loose, or simply wrong for your dog.
Here’s exactly how to measure correctly before you even look at a sizing chart.
Use a Flexible Tape or String on Bare Fur
Your measuring tool matters more than you’d think. Grab a flexible measuring tape or a piece of string — nothing rigid. Slide it directly onto bare fur contact for an accurate skin surface check.
- Maintain gentle tape tension — snug, not compressing.
- Use a helper mirror for even placement.
- Mark the overlap point clearly.
- Keep the tape parallel to the collar line.
Measure at The Intended Collar Position Twice
Always measure your dog’s neck twice — at the exact spot the collar will sit, while your dog is calm and standing. Run the flexible measuring tape level around the neck, snug but not tight.
Repeat the process and confirm both readings match. This consistency verification prevents sizing errors before they happen.
matching numbers mean you’re ready to log a reliable measurement.
Record The Size in Inches and Centimeters
Log your dog’s neck circumference measurement in both inches and centimeters — every time. Dual-Unit Labels prevent confusion when switching between collar brands that use different systems.
Here’s what solid measurement documentation looks like:
- Write the raw number: e.g., 14 inches / 35.56 cm
- Use conversion tables or the exact ratio: 1 inch = 2.54 cm
- Apply precision rounding to one decimal place for unit accuracy
- Build a simple collar fit checklist noting date, weight, and both units
This is how you measure your dog’s neck accurately — and keep that data usable.
Compare Your Measurement to The Sizing Chart
Your recorded measurement means nothing without a chart measurement matching behind it.
Pull up the manufacturer’s sizing chart and find the size range your dog’s neck falls into — then verify whether the chart lists body measurements or finished collar dimensions.
That distinction matters.
Use unit conversion tips if needed: 1 inch equals 2.54 cm.
When you’re between sizes, go up.
Add Extra Length for Thick-coated Dogs or Puppies
Thick coats and fast-growing puppies both demand a buffer.
For heavy-coated dogs, add a Coat Bulk Buffer of two to three extra finger widths when you measure your dog’s neck — this manages seasonal coat thickness without constant refitting. That’s your Seasonal Size Flex built in.
For puppies, add a 2-inch Puppy Size Buffer and recheck weekly.
Collar fit should accommodate growth, not fight it.
Adjust for Coat and Growth

A collar that fit perfectly last month might not fit the same dog today. Weight shifts, seasonal coat growth, and a puppy’s rapid development can all change the equation fast.
Here’s adjust for and when.
Add Room for Seasonal Coat Changes
Your dog’s coat isn’t the same year‑round — and your collar setup shouldn’t be either. Winter fur can add surprising bulk, throwing off a fit that was perfect in summer.
Use collars with Elastic Expansion Sections or Adjustable Slide Buckles to buffer seasonal coat thickness. A Soft Inner Lining prevents snagging, and Color‑Coded Size Indicators make tracking seasonal coat changes simple.
Always recheck the two-finger gap.
Recheck Fit After Weight Changes
Weight shifts change neck size fast. A 5–10% body weight change can add or subtract up to 2 inches around the neck.
Run a Weight‑Change Fit Review every 2–4 weeks:
- Perform a Two‑Finger Gap Check while your dog stands relaxed.
- Complete a Collar Rotation Observation — it shouldn’t spin freely.
- Do a Skin Health Inspection for redness or indentations.
- Finish with Adjustable Slider Tuning until snugness is restored.
Leave Growth Room for Puppies
Puppies grow fast. Add 2 inches beyond your measured neck size, and build in two-finger width space from day one. Keep adjustable collars for growing puppies on hand — fixed-size collars become hazards within weeks.
| Puppy Age | Recommended Extra Length |
|---|---|
| 0–4 weeks | 2 inches |
| 4–8 weeks | 1.5 inches |
| 8–12 weeks | 1 inch |
| 12+ weeks | 0.5 inch |
Re-measure Weekly for Young Dogs
Weekly checks aren’t optional for young dogs — they’re your safety net. Puppy growth monitoring matters because necks can gain a full inch in under two weeks.
Build a simple growth logbook: measure your dog’s neck at the same spot, same time, each week.
- Record neck circumference in inches and centimeters
- Compare against your neck circumference chart from the previous three weeks
- Adjust collar fit immediately if size increases by 0.5 inches or more
Measurement consistency is what separates reactive owners from prepared ones.
Avoid Sizing Based on Old Measurements Alone
That measurement you took three months ago? It’s already outdated. Seasonal Growth Tracking and Weight Change Monitoring exist for a reason — your dog’s neck changes.
Regular Re‑measurement Schedule keeps your Fit Validation Routine honest. Always measure fresh before sizing up. Adaptive Sizing Adjustments based on Measuring Your Dog’s Neck Accurately beat guesswork every time.
Follow current Collar Fit Guidelines, not memory.
Fit Flat and Martingale Collars

Flat and martingale collars look simple, but small placement mistakes can cost you control or hurt your dog. Getting the fit right comes down to a few specific checks — the kind most people skip.
Here’s what to do for each one.
Place Flat Collars So They Sit Evenly on The Neck
twisted collar is a pressure point waiting to happen. For proper collar placement, lay the collar flat against the skin so it sits evenly all the way around.
Collar twist prevention starts before you clip the buckle—smooth it out first.
Even pressure distribution depends on flat surface contact and neck shape adaptation. Check that nothing bunches, and confirm hardware smoothness before every session.
Keep The Buckle Flush and The D-ring Positioned Correctly
Once the collar lies flat, the hardware placement makes or breaks your collar’s fit. Four checks keep everything aligned:
- Buckle Edge Alignment — the buckle sits flush, no tilting or gaps
- D-ring Vertical Centering — stays behind the throat, never on the trachea
- Hardware Friction Reduction — rounded, burr-free edges protect fur
- Strap Tension Balance — no bunching, no twist, smooth pull every time
Set Martingale Loops to Tighten Only When Needed
The martingale loop should tighten only when your dog actually pulls—not randomly, not constantly. That’s Pull Triggered Tightening working correctly.
Adjustable Loop Tension means the loop reacts to progressive leash pressure, then releases when tension drops. This Release Delay Timing prevents abrupt compression.
Think of it as a training cue, not a punishment. Watch for Loop Wear Monitoring and use tightening as Training Cue Integration, paired with reward.
Make Sure Relaxed Fit Still Allows Two Fingers
Even when your dog is calm and standing still, that two-finger gap needs to be there. Run your Finger Clearance Check now—not just during walks.
The Two-Finger Test confirms proper fit at rest, which is where most handlers skip the check. Apply Consistent Fit Monitoring after weight shifts or Seasonal Fit Adjustment periods.
A snug but breathable two-finger rule keeps the collar fit reliable and safe.
Prevent Slipping by Checking Loop and Hardware Placement
A collar that spins around neck or collar slips upward mid-walk has already failed you.
Run fit checks on loop alignment and D-ring orientation before every session.
- Confirm the D-ring faces outward and lies flat
- Check buckle tension — the tongue must seat fully inside
- Do a loop wear inspection for fraying or stretch
- Use hardware padding under any metal touching bare skin
Adjustable collars and collar hardware durability depend on this routine.
Fit Prong Collars Safely
Prong collars get a bad reputation, but most problems come down to one thing — poor placement. When fitted correctly, they’re precise tools that communicate clearly without causing harm.
Here’s exactly how to position one safely.
Position The Collar High on The Neck

High placement isn’t just a preference — it’s a safety principle.
Position the prong collar above the point where the neck meets the shoulders, ensuring shoulder blade clearance so front movement stays unrestricted. Proper collar placement facilitates neck muscle distribution, spreading tension away from the throat for airway obstruction prevention.
Keep the D-ring backward alignment consistent, and you’ll also gain better head posture monitoring throughout every session.
Sit It Just Behind The Ears

Once you’ve got the collar riding high, slide it back just behind the ears. That exact spot is where neck anatomy of dogs gives you the most stability control — the muscles are dense, and there’s natural ear clearance.
Proper placement here delivers three real benefits:
- Leash alignment locks in with your dog’s center of gravity
- High placement benefits reduce trachea pressure instantly
- Collar adjustment stays consistent without constant repositioning
Ensure Links Are Even and Not Twisted

With the collar positioned high, run your fingers around every link. Each one should lie flat, parallel, and in the same plane — no twists, no overlap.
Symmetry inspection matters here. Uneven link alignment creates lopsided pressure and reduces collar safety.
Your maintenance routine should include fit checks before every session. Twist prevention methods start with confirming material finish consistency across all hardware.
Keep The Fit Snug Without Pinching Skin

Once your links are aligned, snug the collar so it follows the neck curve alignment naturally. Apply the two-finger rule: slide two fingers between the collar and skin. They should move, not be forced.
Watch for these pressure point management signs:
- Red marks or indentations after removal
- Skin irritation along the contact line
- Adjustable buckles creeping under tension
- Padding placement gaps causing uneven material softness
Recheck after every session.
Check That Pressure is Even During Leash Tension

Even pressure isn’t something you eyeball once and forget. During leash tension, run a quick Torque Balance Check: watch that the collar doesn’t rotate or ride to one side. Your Leash Tension Monitoring should show an Even Pull Technique—both sides of the neck feeling equal contact.
Uneven Variable Pressure Feedback signals a collar calibration issue. Fix it before pressure sores develop.
Fit E-Collars and Head Halters

E-collars and head halters demand more precision than most people expect. Getting the fit wrong isn’t just uncomfortable for your dog — it can make the tool completely ineffective or even cause injury.
what you need to check before every session.
Place Receiver Contact Points on Bare Muscle, Not The Trachea
The trachea runs straight down the front midline of the neck — that is exactly where contact points should never land.
For proper muscle alignment and airway safety, shift the receiver to the side.
Side positioning places contact pressure against bare neck muscle, not the windpipe.
Fur clearance matters too — part the coat so that contact points sit flush on skin for reliable, consistent results.
Keep E-collar Fit Snug With Two-finger Clearance
Snug means snug — not strangling.
After securing the ecollar, run the Two-Finger Test: slide two fingers under the band. That 2 FingerWidth Space is your standard for Proper Training Collar Fit and Safety.
Too tight cuts off circulation; too loose kills Contact Stability and lets the receiver drift.
Recheck clearance after every Seasonal Adjustment and maintain consistent Growth Monitoring to make sure the two‑finger rule holds session after session.
Center Head Halter Straps Low Enough for Panting
Head halters fail when straps sit too high — that’s where breathing difficulties start.
Position the straps lower on the neck to maintain Airflow Clearance and reduce Breathing Resistance during exertion. Run a Panting Comfort Check after your first walk.
- Keep Jawline Strap Alignment along the jaw, not across the throat
- Set Nose Bridge Padding clear of the trachea
- Confirm proper fit allows free mouth movement
- Recheck dog neck safety on an adjustable padded head halter after coat changes
Make Sure Padding Sits Comfortably Against The Face and Neck
Padding that bunches or curls is a pressure point waiting to happen. Good padding — 2 to 4 millimeters thick — keeps the padded collar flat and distributes tension evenly.
| Padding Feature | Why It Matters |
|---|---|
| Edge Smooth Fit | Prevents skin friction near the trachea |
| Whisker Distance | Keeps 5mm clearance from whisker roots |
| Moisture Wicking | Reduces heat buildup during long sessions |
| Washable Pads | Maintains softness and prevents skin irritation |
Proper fit means the collar sits comfortably without shifting, protecting collar pressure points where it counts.
Check Contact and Alignment Before Each Session
Before every session, run a quick alignment check — it takes thirty seconds and prevents real problems. Make sure contact points are clean, sitting symmetrically on bare muscle, and free of debris.
Confirm two-finger clearance is still intact. Watch for device tilt as your dog moves naturally.
Any shift in pressure distribution or collar position means stop and readjust before continuing.
Spot Signs of Poor Fit

A poorly fitted collar does its damage quietly — you might not notice until your dog is already uncomfortable or hurt. Your dog can’t tell you something’s wrong, so you have to learn to read the signs.
A poorly fitted collar harms quietly — learn to read the signs before your dog suffers in silence
what to watch for.
Watch for Red Marks, Hair Loss, or Sores
Your dog’s skin tells you when something’s wrong — you just have to look. Redness detection starts at the collar line: bright red marks after a walk signal friction, or a fit that’s too tight. Hair thinning observation matters too, since follicle damage shows up before sores appear.
For sore identification and inflammation monitoring, check daily. Any infection warning sign — discharge, odor, spreading redness — means stop training immediately.
Notice Coughing, Choking, or Restricted Breathing
Skin damage is visible.
Breathing problems aren’t — until they get serious.
Coughing or gagging right after putting on the collar is a clear coughing trigger: collar pressure on the trachea is restricting airflow.
Stridor detection matters here — that high-pitched, wheezing inhale means partial airway obstruction, not nerves.
Monitor breathing rate closely.
Any bluish gums or collapse demand emergency response steps immediately — remove the collar, call your vet.
Check for Collar Rotation or Slipping
Breathing issues tell you the collar is too tight. Rotation and slipping tell you it’s too loose.
Watch for D-ring alignment — it should track along the spine, not drift sideways.
If the collar spins around the neck during a direction change, that’s a fit a dog collar properly failure. Material warp from moisture and seasonal bulk both compromise hardware stability. Check rotation detection after every active session.
Look for Scratching, Licking, or Visible Irritation
Rotation and slipping are mechanical red flags. Behavioral ones are just as telling.
When your dog starts scratching, licking, or pawing at the collar repeatedly, that’s the body signaling friction or pressure. Watch for these signs of an improperly fitted collar:
- Red marks or saliva staining along the contact line
- Hot spot lesions from persistent licking frequency
- Swelling, warmth, or odor indicators near the contact zone
- Pressure sores where hardware or links sit unevenly
Refit Immediately if The Collar Feels Too Tight or Loose
When collar feels off, don’t wait until after the walk. Refit immediately.
| Issue | Quick Adjustment Steps | Immediate Comfort Test |
|---|---|---|
| Collar too tight | Loosen one notch, Two Finger Recheck | No red marks after 60 seconds |
| Collar too loose | Tighten until two-finger gap holds | Leash Tension Check—no riding up |
| Hardware misaligned | Hardware Tightening Tips: re-seat buckle flat | Collar stays still during movement |
Use collar adjustment techniques and measure your dog’s neck again if you’re unsure.
Top 4 Training Collars
Finding the right collar doesn’t have to mean hours of research. These four options cover the most common training needs and fit profiles, from everyday walks to more structured correction work.
Each one has been selected with proper fit and dog safety in mind.
1. Joytale Reflective Adjustable Neoprene Dog Collar
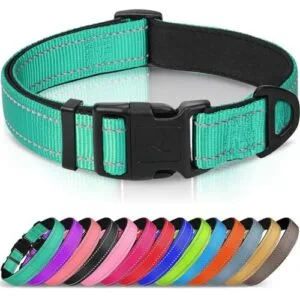
At just $5.99, the Joytale Reflective Adjustable Neoprene Dog Collar punches well above its price.
The soft neoprene padding sits flush against your dog’s neck, reducing chafing during all-day wear.
Reflective threading woven into the nylon gives you genuine visibility on evening walks without batteries or extra gear.
The metal D-ring holds up under real pulling pressure.
One drawback: there’s no separate tag ring, so placement gets tight when the leash is clipped on.
| Best For | Dog owners who want a comfortable, safe collar for everyday walks without spending much — especially those with active dogs or pups still growing. |
|---|---|
| Material | Nylon webbing with neoprene padding |
| Reflective Element | Reflective stitching woven into strap |
| Adjustable Fit | Multiple size holes on strap |
| Hardware Type | Metal D-ring, plastic snap buckle |
| Price | $5.99 |
| Quick Release | Yes – snap buckle |
| Additional Features |
|
- Neoprene padding keeps sensitive or short-furred necks comfortable all day long
- Reflective stitching makes evening walks safer without any extra gadgets
- Fully adjustable fit works from puppyhood into adulthood, so you’re not buying a new collar every few months
- No dedicated tag ring, so attaching ID tags gets awkward once the leash is clipped on
- The plastic buckle has given out on some dogs that pull hard
- Reflective threading fades with sun exposure and frequent washing over time
2. Haapaw Reflective Martingale Dog Collar
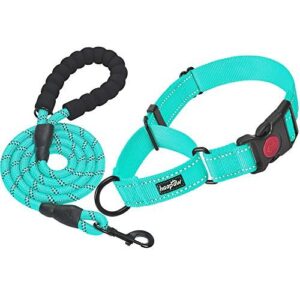
The Haapaw Reflective Martingale Dog Collar is a solid pick for dogs that back out of flat collars. The martingale loop tightens under pull and releases when pressure drops — no choking, no escaping.
Heavy-duty nylon webbing and reinforced metal hardware handle daily wear without fraying.
Reflective piping adds real nighttime visibility.
The quick-release buckle includes a safety lock, so it won’t pop open mid-walk.
One note: sizing runs slightly small, so measure carefully and go up a size if you’re on the edge.
| Best For | Dog owners who deal with escape artists or pullers and want a secure, humane collar for walks day or night. |
|---|---|
| Material | 100% high-density nylon webbing |
| Reflective Element | Reflective piping in webbing |
| Adjustable Fit | Adjustable loop for small to large dogs |
| Hardware Type | Metal D-ring, metal rings, metal clasp |
| Price | Not specified |
| Quick Release | Yes – buckle with slide and safe-lock |
| Additional Features |
|
- Martingale design tightens gently under pull — no choking, no slipping out
- Reflective piping makes nighttime walks safer without any extra gear
- Quick-release buckle with a safety lock stays put during walks but comes off fast at home
- Only comes in turquoise, so color options are a dealbreaker for some
- Sizing runs small — you’ll likely need to go up a size
- The leash handle can have a strong odor that’s tough to air out
3. GoodBoy Padded Dog Head Halter Safety Strap

Strong pullers need head control, not neck pressure. The GoodBoy Padded Head Halter redirects your dog’s motion from the front, which cuts leash tension quickly without choking.
Soft neoprene padding cushions the nose loop and neck strap, so sensitive dogs stay comfortable through long sessions.
The integrated safety strap clips to your dog’s regular collar at the back — no loose hardware, no escape risk.
Not suited for flat-faced breeds, but for medium to large pullers, it’s a practical, humane option at $22.95.
| Best For | Medium to large dogs that pull hard on leash and need humane head control without the discomfort of a standard collar. |
|---|---|
| Material | Nylon webbing with neoprene padding |
| Reflective Element | Reflective thread in stitching |
| Adjustable Fit | Adjustable side, neck, and noseband straps |
| Hardware Type | Metal chin clip, quick-release buckle |
| Price | $22.95 |
| Quick Release | Yes – quick-release buckle |
| Additional Features |
|
- Soft neoprene padding on the nose loop and neck strap keeps sensitive dogs comfortable even on longer walks
- The integrated safety strap clips to your dog’s regular collar, so if they slip out of the head portion, they’re still secure
- Reflective stitching adds visibility during early morning or evening walks
- The plastic chin clasp can loosen or break under heavy, repeated pulling
- The wide nose strap may block some dogs’ peripheral vision, which can be distracting or stressful
- Not a good fit for flat-faced breeds like Bulldogs or Boxers, or very small dogs like Chihuahuas
4. PetSafe Wireless Pet Fence Collar
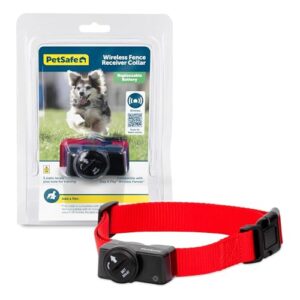
If you’re running a wireless fence system and need an extra collar, the PetSafe Wireless Pet Fence Collar (PIF-275-19) does the job cleanly at $85.
It fits neck sizes 6–28 inches and includes both short and long contact points for different coat lengths.
Five static levels plus a tone-only mode let you match corrections to your dog’s temperament.
The nylon build is fully waterproof, and it pairs with any PetSafe wireless transmitter.
Battery life runs 1–3 months on a single RFA-67D-11 cell.
| Best For | Pet owners with an existing PetSafe wireless fence who need to add a second (or third) dog to the system without buying a whole new setup. |
|---|---|
| Material | Waterproof nylon |
| Reflective Element | None listed |
| Adjustable Fit | Fits neck sizes 6–28 in |
| Hardware Type | Nylon collar with contact points |
| Price | $85.00 |
| Quick Release | No – adjustable strap only |
| Additional Features |
|
- Works with any PetSafe wireless transmitter, so adding more dogs is straightforward
- Fully waterproof and adjustable for different coat lengths — short or fluffy, it fits
- Five correction levels plus a tone-only mode means you can train gradually at your pet’s pace
- Batteries need replacing every 1–3 months, which adds up over time
- Only works with PetSafe wireless transmitters — not compatible with in-ground or remote-trainer systems
- At $85 a collar, outfitting a multi-dog household gets expensive fast
Frequently Asked Questions (FAQs)
What is the 3 second rule in dog training?
Strike while the iron is hot.
The 3-second rule means you have about three seconds after a behavior to deliver feedback. Wait longer, and your dog won’t connect your response to what just happened.
What are the common mistakes in e-collar training?
The biggest e-collar mistakes: starting before leash basics are solid, skipping stimulation acclimation, and using corrections without a clear plan.
These create confusion, not compliance — and slow your training down fast.
Can two dogs share one training collar?
No, two dogs can’t safely share one training collar. Every dog needs its own properly sized collar.
Sharing risks poor fit, uneven pressure, and lost leash control — all of which compromise safety and training.
How often should collar hardware be replaced?
Inspect hardware monthly. Replace buckles and D-rings immediately if you spot cracks, rust, or deformation. Nylon and neoprene wear out in 12–18 months under heavy use — sooner if fraying shows.
What age can puppies start wearing collars?
Funny how such a tiny creature needs gear so soon. Most puppies can start wearing a collar at 8 weeks old — short, supervised sessions only until they adjust comfortably.
Should collars be removed during car rides?
Yes, remove collars during car rides when possible. Collars concentrate force on the trachea during sudden stops.
A safety belt or vehicle-rated restraint spreads impact safely and gives you faster emergency access.
Can collars interfere with microchip scanners?
Most collars won’t interfere with microchip scanners — yet metal hardware can. Fabric and nylon cause no issues. Remove metal buckles or rings before scanning to make sure a clean read.
Conclusion
Fit isn’t a small detail—it’s the whole leash. When you know how to properly fit a dog training collar, you’re not just adjusting hardware.
You’re setting the conditions for clear communication, consistent results, and a dog that stays safe during every session. A collar that sits right works right.
Measure twice, check often, and don’t wait for a red mark to tell you something’s off. Precision here pays off every single walk.